In this tutorial, we’re going to look at how to migrate to new Synology NAS.
Some users who are upgrading their NAS are facing a problem: how to easily migrate data from the previous Synology NAS to the new Synology NAS? Here I will provide you with three options. You can choose the method according to your actual situation.
1. Hyper Backup – How To Migrate To New Synology NAS
I don’t make a mistake! This backup package can also be used for migration! Its strength lies in its versatility, with almost no model restrictions. It can migrate data, packages and system settings. But it also has some limitations. First of all, it can not migrate all packages, the packages that the Hyper Backup supports are as follows.
- Synology Directory Server
- Glacier Backup
- Note Station
- SSO Server
- Calendar
- Hyper Backup
- Office(Spreadsheet)
- Storage Analyzer
- CardDAV Server
- WebDAV Server
- Hyper Backup Vault
- OAuth Service
- Surveillance Station
- Synology Chat Server
- MariaDB
- Photo Station
- Synology Application Service
- LDAP Server
- Synology MailPlus
- Presto File Server
- VPN Server
- Drive
- Synology Mail Server
- VPN Server
- Web Station
- DNS Server
- Moments
- RADIUS Server
Secondly, since the Hyper Backup involves two steps of packing and restoring, the entire migration can take a bit longer. And the last disadvantage is that you need some space to store the files temporarily during the migration process.
For example, if your old Synology NAS has 1.8TB of data, it means that your new machine must have a storage capacity of more than 3.6TB, or a removable hard drive that can carry 1.8TB of data, otherwise you can’t use Hyper Backup to migrate your data in your old Synology NAS. If you’re switching over a large span, such as upgrading directly from the J series to the DS920+, and you also want to keep the data on your original NAS intact, then this is a good way for you to go.

The operation method is also very simple. For ease of distinction, we will refer to the old Synology NAS as A and the new Synology NAS as B.
First you have to install [Hyper Backup] on A, install [Hyper Backup] and [Hyper Backup Vault] on B. Run it on A and create a new [Data Backup Task]. If you choose a removable drive as media, you need to check [Local Folder and USB]. If you want to migrate data directly to B, then check [Remote NAS Device]. You can then follow the guidelines to select the files, packages and settings that you want to migrate, and then just wait. Once the transfer is complete, you need to open Hyper Backup on B and click on the [Restore] icon > [Data]. Click [Restore from existing repository] > [Local folders and USB] and find the file with .hbk extension, then follow the instructions and wait for the migration to complete.
After the restoration is completed, please do not rush to delete the data package. Please make sure that the new machine is used properly and the data is complete. You’d better use it again for a while to prevent accidents.
2. Migration Assistant – How To Migrate To New Synology NAS
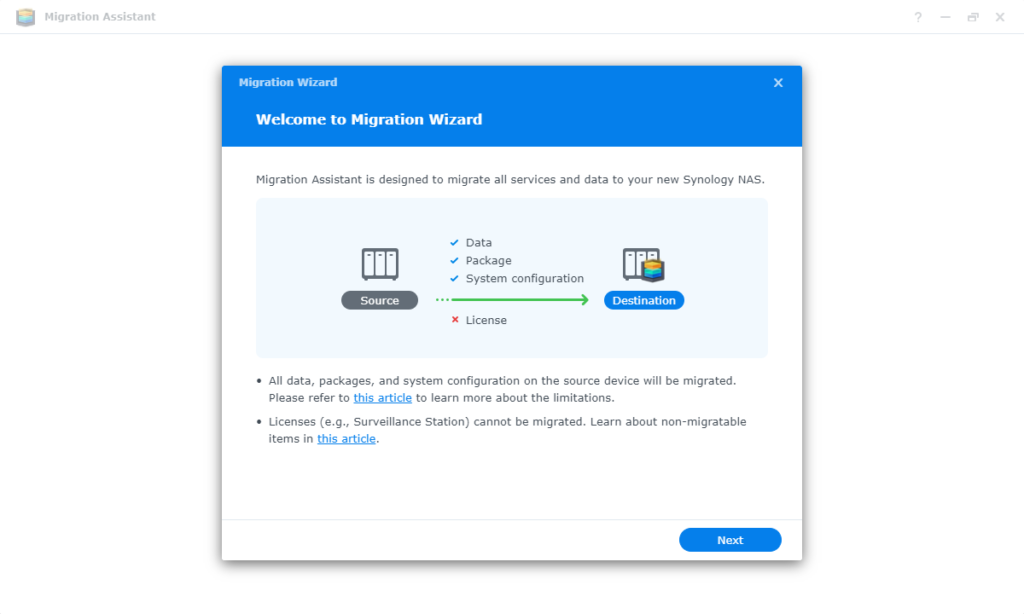
Migration Assistant is a package dedicated to data migration. Its biggest advantage is “senseless migration”. After the migration starts, the old NAS can still be used normally without any impact, and new data generated during this period will still be migrated to the new NAS. However, here are its limitations.
- It mainly supports the Plus series and above (DS416play and DS418play are also supported).
- The new NAS also needs to have considerable storage capacity.
- Both systems and packages need to be updated to the latest version.
The following data cannot be migrated.
- The DSM version on the destination device will remain the same
- Synology Account Settings
- Licenses
- Network Settings in Control Panel
- Server Name, Default Gateway, 1Pv6 Default Gateway in General Tab
- Network interfaces (except VPN profiles, IPv6 tunnels, MTU values in IPv4 settings, and 802.1X)
- Static routing
- External Access Settings in Control Panel
- Push Service Settings in Control Panel > Notifications
- Desktop widget and taskbar settings
- Virtual Machine Manager settings
Migration Assistant is very suitable for users who need to use their Synology NAS frequently. With Migration Assistant, you can replace NAS and continue to use it at the same time.
3. HDDs Migration – How To Migrate To New Synology NAS
The last one is this simple and rude migration method, just swap the HDDs on and you’re done! However, please be sure to confirm the following information before starting the operation, otherwise it will be a blast.
First, you need to make sure that if your old NAS is in the list below, if your old Synology NAS is listed below, then it is not possible to migrate the HDDs to another Synology NAS model, so you cannot use this method to migrate data.
- 19 Series: RS819
- 18 Series: DS418, DS418j, DS218, DS218play, DS118
- 17 Series: DS1817, DS1517
- 16 Series: DS416, DS416play
Next, you also need to confirm that your old and new NAS match the correspondence in the chart below, and only the combination of “O” indicates that it is feasible.
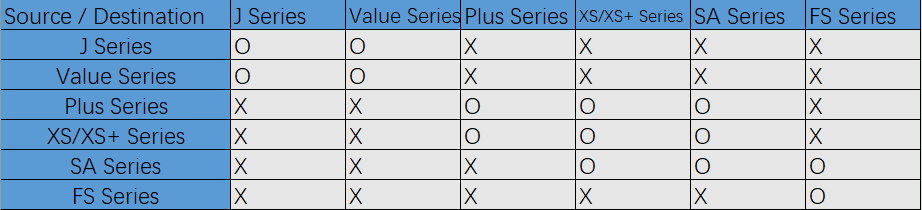
If your NAS devices meet the above conditions, then congratulations, you can make a backup by HDD migration. In order to keep the settings synchronously, first click [Control Panel] > [Update and Restore] > [Backup Configuration] to back up the configuration file. Then, please make sure you have backed up the important data to other storage media again to prevent accidents from happening and cannot be recovered. It should be noted that the data in the list below cannot be migrated to the new NAS by this method, so be sure to have the psychological expectations.
- LDAP Server (formerly Directory Server) database Photo Station
- Auto block settings
- Video information content in Video Station
- Mail Server and Mail Station Settings
- Surveillance Station Settings
- Download Station tasks and temporary storage
- All media files will be reindexed after migration
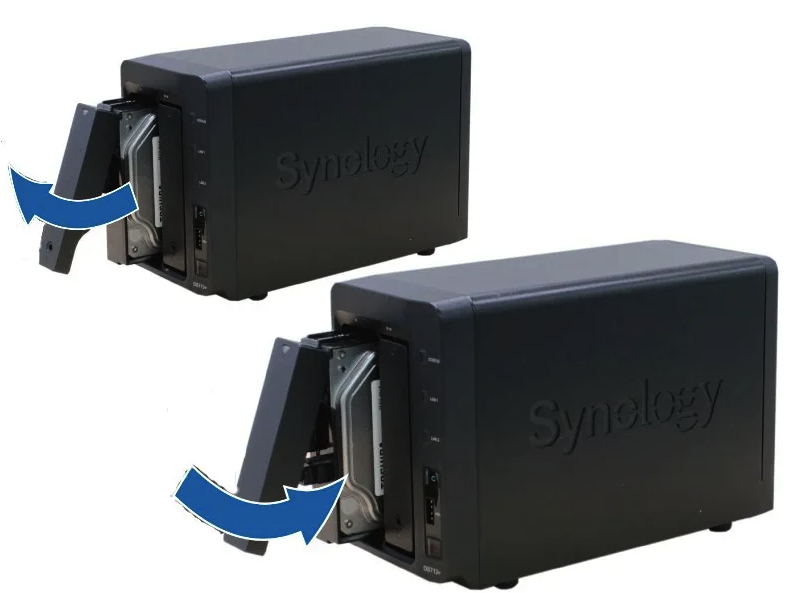
Once this is done, shut down both the old and new Synology NAS, remove the hard drives from the old machine and place them in the new NAS in the original order and boot it up. Then connect to the new NAS on the web and follow the instructions to complete the installation. Once you have safely booted up, as long as you go to the place where you just backed up your system settings and restore, and you will get back the memory data you once had.
If you see a warning message like “Note: All data on the drive will be deleted” during the installation process, it means that the data on the installed hard drive will be deleted. Be sure to stop immediately and close your browser, and make sure that you install the drives in the same order as they were installed in the old NAS. If similar problems still occur, please contact Synology after-sales technical support immediately to avoid data loss.
Conclusion
The above is the tutorial of the three migration methods. After reading this tutorial, is it easy for you to migrate data for the new Synology NAS now? I hope this tutorial can give you some reference for data migration needs. You can choose a suitable method for data migration according to your own situation. The Synology NAS has always impressed me as simple, stable and versatile. For users like me who don’t like to toss in depth, both the installation method and the system interface, including the installation and use of the packages, are quite user-friendly. Many functions that you want to achieve through NAS, including data migration, can basically be completed through the built-in packages.
Read More: